Textures, Real World Lighting & Q&A - Designers Show #78
May 23, 2022
Robin and Rene discuss a few lighting and texture topics and we also talk about working with walls and windows in Chief.
And as usual we discuss all things Chief in an open forum discussion.
Introduction 00:01
New courses with Chief Experts Academy 01:35
Lighting makes a difference 05:55
Robin's sizing formula for lighting 17:03
How to soften bright exterior light 20:32
Robin's can light recommendation 22:12
Lighting with Integrators (Smart technology) 28:24
SketchUp Textures Club 32:57
Using Textures in Chief Architect 35:23
Importing textures/materials into Chief 41:50
Using texture mapping tools in Chief 55:08
Using doors to create open windows 1:02:26
How to create walls with different layers 1:03:26
Resizing a wall 1:06:32
Brick joint thickness & bump maps 1:09:50
How to define a window sill 1:13:35
How to know correct number of bricks in material list 1:16:12
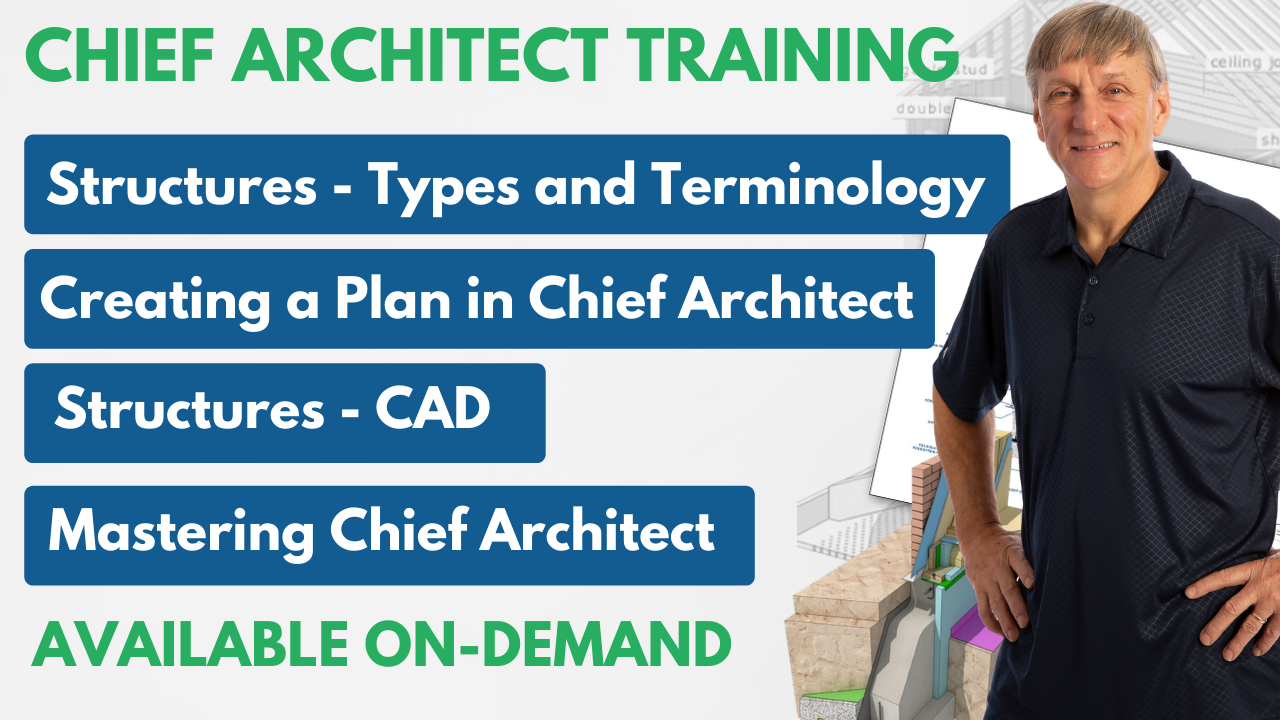
Wrap Up & Dan's Upcoming Courses 1:17:06
Transcription:
All right, welcome everyone. Dan here with Chief Experts and today we're online with John, Robin and Mr. Rabbit Design himself, Rene Rabbitt.
Hi everyone! How (are) you guys doing today?
Fabulous. How are you?
I’m doing good.
I’m doing great, thanks.
It's another beautiful day here in Minnesota. They had some good rain, which we need and I wish the rest of the country would get as much rain as we've been getting and we wouldn't have all the drought problems around the country.
Anyway, it's been good. So today we're going to discuss a few things.
Robin's got some interesting things to share about how to do lighting in the real world, not in the Chief world. So, we're going to talk a little bit about that. And that Robin's about to launch --- that we're going to do together.
And then we're going to also talk a little bit about textures. What are textures and how to use them in your plans. And by all means, if you guys have questions, feel free to type them into the chat and we'll try to get to them as best we can.
I did get an email from someone that had a couple questions, and it goes, George, George we'll try to get to your questions too so thanks for sending those in.
Again, I’m Dan Baumann. I'm with Chief Experts and we do Chief Architect training amongst other things.
So one of the things I’d like to share with you right now before we get started would be the new courses that we've got coming up.
So, you'll see a link to those courses on the screen that you're viewing this on. If not, you can go to Chiefexpertsacademy.com and you can go to a store and you'll see those new courses listed there. They're actually on the home page too.
So we're going to be doing - Robin and I will be doing - both of these courses. Robin's going to be driving the bus on these for the most part because she's the pro at these two things and I’m going to be there to assist.
Intro to Chief Architect for Interior Designers - this is a course, Robin, that you teach in community college in Portland, right?
Yeah, right. Yes in our interior design program, yes.
Cool! And you've been doing this for a while?
A few years now and it's been very cool.
I actually, you know, you guys would love this. I actually did a presentation to some of the other departments and our Performing Arts Department is going to incorporate Chief for set design. Isn't that great? I was pretty excited about it. They were pretty jazzed about what we can do with this program.
I’ve worked with companies too there, helping them with their Set Design and teaching how to use Chief so I know what works well for that so she works well.
Right! And this course is really for people who've just opened up Chief. Really the basics. Really teaching people the basics of how to start designing and we're really focusing mostly on Kitchen & Bath.
But we're not doing roofs, we're not doing exterior stuff. We're really focusing on the interior of the house and getting you set up so, that way, you can be successful to start at that level. So, it's really for your new employees to get started on this.
And then after you do that, then you start taking classes with Dan, and with Rene, and with John to know more details, and the more exterior stuff, but we focus on the interior
Yeah, you'll learn a ton - guaranteed. And then the ‘Real world Lighting Design for Kitchens and Baths.’
So you know, we always talk about lighting and Chief Architect doing our renderings and making them look good.
This is not about that. I mean, actually well it is at the end.
But you're going to be talking and teaching people how to actually do lighting in a room, real world lighting.
Yes, and understanding how to specify lighting and how to locate lighting and really understand the difference between lumens and delivered candle power and beam spread, and really knowing how we're not just throwing different kinds of lighting. We're not just throwing lights in a space.
I mean the lighting world has changed so dramatically in the last decade, it's just not even funny. So, you got a lot to learn.
I was talking to you yesterday and you said you're reading a magazine and you're so excited about these new lightings that are coming out. It's like this is the coolest thing. So, I could tell in your excitement you’re kind of a geek about lighting. Get pretty excited about this topic. So, this will be fun and I’m looking forward to it too because my idea of lighting in a room is to go to Chief, plop a light fixture and then go to the next room so this would be helpful for me.
I would like to be able to advise my clients a little better, but we'll get into that a little bit.
Let's get moving here.
So again, thank you guys for being on the call today. Type your questions in.
We got Bill. Thanks for being here.
Michael Moore, thanks for being here. Doing good like the motorcycle dude.
George, hi from the UK. What time is it in the UK right now?
Oh gosh! Hello Albert from South Carolina!
And Frank in Las Vegas.
I was just looking at our place for the Builder Show next year and I got a reservation in it so sign me up. I think we'll be going there. So, yes.
I’m excited about that. It's been a long time. I’m really, really, fried about not traveling. I haven't been anywhere, of any substance or whatever you want to call it, in a long time pre-COVID, So not like Rene who's in Costa Rica – yes, good for you!
Okay, Robin, let's talk about lighting. I would like you to start us out here and let's do that. You know go ahead and if you got something, by all means, please bring it.
Let me see how I can share my screen. You know I’m sorry I have not shared a screen before on this so you know.
Lighting is not just putting cans in place. It's really starting to talk about how we're going to illuminate the space.
Lighting is not just about putting one light fixture in the middle of space nor is it just like putting cans everywhere or putting cans in a row. It's about putting, illuminating. It's about understanding what we're illuminating and why we're illuminating it, so not all light is the same. It's about thinking about layers. It's thinking about accent lighting and task lighting, and ambient lighting, and understanding how the lighting changes the emotional response to a room, so lighting is what enhances your design. You know, you choose beautiful cabinetry and beautiful finishes and countertops, and if you don't have good lighting, close your eyes - that's what it's going to look like. So, we're really going to delve deep into really understanding led lighting and that's really the focus. It’s mostly on led lighting, but it's understanding how to create layers in a room so that way when you create your projects, that when the projects get completed, they look amazing. That they're just not a pretty space but it's the space actually has a personality and I guess that's probably the best way to describe it.
I recently went on this project that we're looking at here and when I specified the cans it was a light fixture that my electrician had never used before. I had never worked with this contractor before, and they kept calling me saying there's not going to be enough light in here. There's not going to be enough light and I’m like you guys just have to trust me on this one, and when I called them at the end of the project, I said “hey, I’m going to be there and let's get together so I can just kind of walk through the project together. Both the electrician and the contractor walked in and gave me a hug and said this is the prettiest project I’ve ever done and the lighting is amazing and I was so impressed that both of these people told me that the lighting was good even when they had doubted it from the beginning. That's really cool, it was fun and it was fun to be able to show them.
The other thing I’m going to give you is the verbiage to use. You know, clients always think that lights have to be - they get stressed out. When you're looking at this plan the lights are all over. The fixtures are all over the place. They're not in alignment. And I’m just going to try to illuminate them so you can see where they are, right? So all of the light fixtures, they're not all in alignment.
You can see that they're all over the place and I want to be able to share with my clients that lights - that cans - do not need to be all straight lines. We're not doing a grid system. We're not illuminating a Kroger’s grocery store. We're illuminating someone's home and we have to think about that. Do you see what happens? It just dawned on me that like when you line up all the lights, the can lights in a grid, it's kind of like we're trying to do general lighting for the room at that point, right?
And if you want to light the whole room up with can lights - I suppose that's fine - it's going to be uglier than heck. But that's not the right way to do it, right? No and it gives too much room light in a room like I went to my cousin's house in Chicago, and she lives in a very exclusive neighborhood. And she hired this amazing designer. I’m kind of putting quotes around this, and the designer put in this tiny little sitting room nine recess cans in there and seriously, that is not the kind of I know. I can see Rene's eyes just go seriously. It makes a space too bright, it's not a cozy room. It ruined the whole emotional response, the emotional feel of that room. And I know that I’m going to, you know, get into this emotional thing. But you know the conversation.
The kind of lighting you need in a living room is different than you need in your kitchen. You know. Sometimes it's hard when you're trying new lighting design and you're working with an electrician who sometimes isn't up on the newest things to get them to understand why you're doing this.
They're like just tell me where to put the cans, lady kind of thing.
And it's some and what you need to have is the right words to use.
When I have a client who argues with me like the lights all need to be in a row, that's when I start using the terms like, well, the focus of the object of this lighting plan is to illuminate the countertops right with the correct beam spread and the correct delivered candle power, so that way, we have the overall lumina output on your countertop.
And when you start using words like that it goes way over their head and all they want to do is they just nod, and that's all that matters because then I get the lighting correct and I’m not again I’m bullshitting them. But you know what? The reality is, no, it's not bullshitting. That's telling them that down like it is, I mean, that's the terminology you use to do this. Yes, it is manipulation though. Well absolutely it's manipulation
You're not going to tell someone you're going to put a big board above a door, in a window, are you going to put a header above the door and window?
Yeah, that's terminology.
There you go
You're right, and John, I am with you. It is absolute illumination because at a certain point nobody wants to argue with me so oh i am saying cans. C-a-n-s.
So for the Canadians, I think, you call them pots. Canadians call them pots.
Anyway that's where we go with the lighting, and the goal is in reality I’m not increasing the budget on the project. My lighting plans don't cost typically any more than a good quality lighting plan. So it's not like you're raising the numbers but you are illuminating the countertops properly. You're illuminating the rooms properly. And we will talk specifically about certain products that I recommend. So we will talk about those. And how to read IES charts. Well, not IES charts but how to read beam spread chart, so, we'll be talking about that.
Okay. So as an interior designer, I mean that's not typically part of an interior designer's job, is to make sure the lighting is right.
Yeah, you know, I think sometimes, it's kind of like some designers do it and some designers don't. I can't imagine not doing my own lighting plan. I really can't imagine not doing my own lighting plan but then I’m a control freak so there you go.
Well, I mean that might be part of it but as a you know me, I’m a designer. I like form and function and I’ll make sure the cabinet's the right size and then I’m done. I don't do colors. I don't do materials. I don't do fabrics. I don't do lighting. I rarely do electrical plans. So maybe if I knew more about that, I might do that.
Dan brought up the colors, the cabinets and stuff like that. Does your lighting change depending on the color of the cabinet?
You know that's - yes it can, based on the kelvin temperature of the fixtures and there are… I was just watching a video just recently where they actually were recommending using different kelvin temperature per room. And I can see that for a bedroom. But I’m not sure I totally agree with that. And that's a conversation that I think at a certain point I’ll show you how to do it. And then we can have that conversation because now it's then some of that becomes subjective, right?
I’m going to teach objectively how to do a lighting plan and then subjectively. You're all designers and you're going to put your own your own fix on the final, right?
I had a client once that wanted the walls painted, John, to your green, in the ceiling, black. You probably like that room a little differently.
Yeah, just a little differently. It's a good color green though.
That's a long time ago that was really quite a room.
Rene was going to make a comment. What were you going to say?
I oftentimes use lighting to direct someone's eye to something that I want them to focus on, especially if it's a room that maybe we don't have the budget to touch. If it's a remodel and I want to direct someone through the path and away from things that we just can't avoid.
Yeah, lighting can do that. Lighting can create depth. You put a – you know - a specific task light behind something that's protruding into the room and now you've got depth. So, yeah. So we've got a lot of tricks.
Rob give us the formula for putting a can light above a counter, you had done that once in a class.
I don't have that accessible to me right now. I’m sorry I don't, but typically what we do is I’ll look for it so you could come back to me on that one and I’ll show how to do that one again.
But I do want to finish up with the four-week course that we're going to be doing. And the last week Rene is going to show us how to use Chief to put lighting into your plan, and really do it the right way because it's kind of a little bit of magic that you do with that. So for people who are wanting to learn how to do more real-time rendering and make the lighting look appropriate, my lighting doesn't and you're looking at this plan, you're not gonna see perfect lighting in here at all. So it's not, I mean, my cans aren't even showing light, you know. It's not, the cans are illuminated but they're not creating, they're not illuminating the space, right?
So, it does give you some opportunities to make your project look more realistic.
So what this is it's a ceiling height that is set at 36 inches or 96 inches in the countertop, set at 36 inches, and what we're looking at is the beam spread of the recessed can and I just used kind of a generic beam spread. I think that's set at 36 inches.
The idea of what we're trying to achieve with lighting, and this is lighting for task lighting using recess cans for task lighting, what the idea of that we're trying to do is we take the beam spread and we're working off of what's called a work plane.
So the work plane is our countertop, right? Six inches above that is where we want the beam spread to crisscross, as you see in that little dark space, and the line is off a little bit but it should have been at six inches high.
Anyway, that tells us where we're determining - getting the most amount of the light, most amount of the candle power, the delivered candle power out of that light fixture that's way up in the ceiling so then it's to determine exactly how to determine the amount of foot candles that are on our working space. Foot candles is the - on a kitchen countertop, we're trying to get, achieve between 80 and 100 foot candles.
I typically get around 90 foot candles which is incredibly bright you guys.
When I illuminate my kitchen countertops, when I do a kitchen with lighting, it's so you have to put in dimmers because it's amazing.
This kitchen that I was just showing a picture of, she says the kitchen is so perfect, I turn the lights on, they're amazing as soon as my husband walks in the door, he immediately turns down the lighting in there. So I would really rather have the lighting brighter and have people put it on a dimmer than for it not to be enough lighting.
So what we're trying to do, this little diagram that we're showing here, shows how to determine the correct beam, the correct beam spread, and select the correct fixture to get the right amount of foot candles on the counter top. So it's dealing with a lot of things. It's dealing with the height of the countertop, of the height of the room where the cam the countertop is, what the beam spread is of the light fixture of the lamp that we are choosing the light bulb which is actually called the lamp and then making sure that we have the correct amount of foot candles in on hitting the working surface.
I hope that makes sense so that's what we're trying to do. That's what the little image is.
I just posted a link, you can watch this little video about this, so it's in the text there so you can click copy and paste that, or click on it.
So I went into a remodel job quite a few years ago and noticed that it was a… it was in the winter. There was snow on the ground, the windows were facing south, basically the whole south wall of the room was windows. Had tons of light coming in through the windows, but it was a dark interior. The trim was dark around it and things like that around the windows.
It was painful to look out that window because of that.
Yeah, right. So did you do anything to daytime versus nighttime lighting kind of thing for situations like that?
Well it sounds like those people need some kind of window coverings to help to illuminate the glare that's coming in because you have south-facing windows.
But if you want to look out the window, if you want to be able to look out the window and enjoy the scenery, you know then you can't put window coverings over it.
This is a photography trick. When you go to shoot a real estate shoot and
you've got over exposed exterior, they put spotlights in, too. And then that changes that exposure. It's the same with their eyes.
You put spotlights on the inside going.
Supplemental interior lights can make, can soften that, you know, hard contrast.
Yeah and I noticed that too.
And then when we remodeled it we lightened it up so that change lightened up the interior, which changed your perspective looking out the windows too.
Well part of lighting design is also, you know, I mean we're designing the lighting mostly for the evening you know - for when there is no natural light. But you still have task lighting you have to deal with and window coverings actually definitely come into play.
We do spend a lot of time talking about the evils of these horrible fixtures. We talk a lot about the evils of these. I mean these are horrible, these are the worst thing. But we talk a lot about these which are, these are the type of cans that I’m using nowadays. these are this brand is actually called Nora lighting and they're integrated led cans and they come with a driver. So essentially your electricians are just dropping wires at Ruffin and that's all they're doing. And then you're doing your final placement on finish which is really fabulous. But then you have little drivers in here, right? So, it just goes right up, they connect, they go right up into the ceiling and they're really fabulous. And they just connect like that. You're gonna love these. This one's actually really amazing. Check this out, Rene. You have 360 degree tilt and you have 90 degree control on that. That's like the best art light.
It's a two-inch can. This thing is amazing. I'll put it (the link) in there. These are my favorite IC ratings. All that stuff. There are special ones. I had to order a special one. I was doing an ADU, so between the ADU was in the basement. I'll put that in the link. I’ll make sure you have that.
What was the manufacturer? NORA lighting. That's the website. These are I think, they're called the art, the m2s, they're the two-inch recess cans. When I was doing the ADU, we had to have a special fixture because it had to be a completely separate unit from the upper level, so it had a fireball on it. There was a special thing that we had to order and it did mean we had a special order as a different fixture for that application.
Because it's almost a commercial product. But otherwise I use these all the time and the cost on them is not, it's only a teeny bit more and we're talking like less than ten dollars, than putting in a regular ugly full box remodeling can, and putting in a good quality led lamp.
So we're moving a lot more towards integrated cans and you know - the big problem with integrated cans that people always say, “but when they fail what do I do?” You know, it's like “Well, you're going to replace them, they're going to fail in like - what do they say - 18 years.”
And the CRI on these - the Color Rendering Index - is over 92, I think. So it's amazing they're not at R9 CRI rating. They're not that level. But they do have pretty good stuff. So, if you are working with a client who has high-end art, then we would go to a different product. But for the average person, this fixture works amazingly well.
So that's the kind of things we're going to be talking about. So it's really cool and fun and you get to use your math. You know, a good example of bad lighting is at my dentist's office, right above the chair. Two by four recess panel with four glaring white bulbs that I have to stare at.
Come on, they can do a little bit better than that, just give me a pair of sunglasses. So not a lot of thought goes into lighting in places like that. Anyway you know I think that's the biggest problem with lighting is there's not a lot of thought put into it.
There's not a lot of thought because a lot of people, most people don't know, most designers don't know enough about lighting, first of all and then, it's more of an afterthought – “let's just put a light bulb in the middle of the room” - well because that's enough light.
A lot of the contractors I designed for say “you don't have to do electrical plan, my electrician will just figure it out.”
Robin do you ever put, do you have any good up lighting fixtures ,wall up lights?
Well now are you talking like wall sconces? Are you talking about--- I don't do exterior lightings just so you know that.
I like putting in kind of a featured corner into a room and illuminating it from not only up above but down below as well. And it looked like that that particular can could be used even though it'd be nicer if it was like a square can so…
You know, no, I don't. I haven't done that kind of lighting. Typically if I’m going to do anything, you know, I do a lot of tape lighting. Led tape like in token baseboards or in cove lighting, you know. I love doing cove lighting like that's like the best thing ever. But no, I haven't done that so I’d love to know what your idea is and then we can always find something.
I’m going to ask Kevin to join us in this class, and John you know exactly what I’m talking about. Kevin Johnson, a good friend of mine in Kansas, is phenomenal at lighting. He does some amazing stuff. He would answer your question.
I don't know what a CSL whisper fixture. I don't know what that is.
They're really cool. I have not gotten a chance to use them yet. I’ve been trying to push them through but you have to pull that up.
I will look at something we'll check these out. Dan can you look, can you show that CSL whisper fixtures? I’ve never heard of them.
Let me look it up.
Rene, do you do much with integrators? Do lighting with integrators like smart house design and stuff like that?
I do a lot of that. I always have. So I do my lighting plans and all of my light switches are always z-wave. So the client has the option to upgrade to a smart system or not. They could use them as don't switch or not, so my switches all have 11 functions in a single switch, in a single rocker switch, so that they could do 11 different scenes if you want and then I’ll also put in scene controllers.
I love using scene controllers, but I usually use Lutrons. This is a brand called z-wave?
Well z-wave is the operator essentially, so Lutron's using wi-fi for their systems and so, you get some latency over time if you've got enough devices. So when I get into a home and I’m pushing 40 plus devices, things just don't operate that well in terms of a smart home with the Lutron system the way I want them to. So I like to have the flexibility of using z-wave because it's a radio frequency. And it's a mesh network so it just expands the radio mesh, if you will, so you can keep expanding out towards your garage, out towards your front gate, that kind of thing. And all these things can be controlled using scripting so that I can turn on your front door lights after 10 o'clock if you open the door. You know, you can illuminate a path to your bedroom and that kind of thing.
I'm going to check that. That's pretty cool.
Have you used those in projects? And speaking of smart home, the contractor I’m working with just an 18 000 square foot house in Texas and you can control the lighting the whole house from your phone.
And it's just that's pretty nice.
Just phenomenal of course.
The lighting thing - I’m going to check that out and see what the beam spread is on that and how they can be used, because that sounds like a very interesting product. I’d like to know more about this one. And I do have worked with this product, I mean this company, but never that product so I don't know anything about it. So, I’ll check it out. The fact that they're half of an inch aperture but it's really then what it's looking at more the details of it.
Because this looks -- I don't know if it's --- yeah, we just have to check the paperwork on it and see what it says for functionality and how you can use it.
It doesn't cast your hard cone light on the wall, so it's going to make for a really nice environment.
All right we need to move on here.
All right thanks, that was great information. I hope you guys get a sense of how - I mean we touched on just a speedy itty-bitty fraction of a percentage of what goes into lighting, and I’ve never really researched lighting in my entire life. So, I’m really excited about this course. I’m looking to learn a ton.
It looks like they have really good lighting. I mean I need to check these babies out because this sounds really sexy, super sexy lighting.
If we name it a super sexy lighting class, we should get a lot more people right?
I think so.
All right speaking of ugly backsplashes let's move on to textures and again believe me I’m not actually doing this in a project. This is just something I just stuck this on. I literally learned about this website, 400 range each fixture.
Oh my goodness! For that price, I would go to - there's some other fixtures - but these are pretty cool looking. We'll check them out anyway.
Let's talk a little bit about textures and I’m so glad Rene is here today because he does a lot with textures and maybe you can clarify a few of these terms that keep popping up in Chief. I just want to show you something really quick. I just downloaded this one a little bit before the session today from the website - it is called sketchuptexturesclub.com. There's a link below the video if you're on my website. It's free, you can download up to 15 textures a day of the basic texture where you can get the texture map itself and then for a whopping 14USD a year, you can download all the high-res images and these little things which have Displacement, Specular, Normal and Ambient - which is what I want to know more about, because those are what make your textures pop.
I know some of the textures I looked at had even more of those kinds of things with it so, check it out. Maybe wait till after we're done talking about this or you can check on it now but go ahead and join. I asked the person that runs this if she would join us today. She sent a message last night that says she'd love to but she doesn't speak any English, she's Italian, so she's in France. So, I kind of figured that probably wouldn't work so well.
Anyway, I joined. I spent the $14 and got the full membership and you can get all that plus. You can get a whole bunch of 3d SketchUp models of complete rooms so if you use SketchUp, you can download these models and use things from them or you could just go look at the rooms. I have not done anything with those yet so check it out. I was just mostly interested in the textures.
So, what about these textures? Here's an image I just downloaded. You look close at it, and you can kind of see what it looks like. I just clicked and clicked and clicked and I grabbed one, I didn't look at anything, okay? So don't judge me in my choice of backsplash materials. So, these are the differences in those. So, let's talk about that a little bit.
Look at how nice that looks when you get up close to it. I'm in the Chief. So, we're really getting that depth of field. We're getting the texture. I mean it looks like a 3d object, doesn't it? You know with the lighting moving on and so again, I'm really pleased with what Chief is starting to do with all of this stuff now. So, you know if we go look at the floor, this is a Chief image right here.
Even with the warping it looks great, with the cupping it looks fabulous.
Yeah, but it's not giving me any depth of field. It's not showing like the joints are bigger, so let's just take a look at the material for a second, then we can go download one. And I’ll show you how to do that stuff in Chief.
So, if I click on my rainbow tool here and I click on top of this texture, again a texture and chief for any CAD program is nothing more than an image, okay? It's a photograph of something so whenever you hear the word texture, think photograph all right?
So, here's that image I downloaded.
Here's the texture, here's the basic image that we could use in any photograph can become a material in Chief or any CAD program. Piece of cake. But what really makes it hot - what really makes the texture pop and look good and have the right sheen and the right depth of field are these things here. The bump map, normal map, normal map ambient occlusion, and then we've even got a few more here called the roughness map in a metal map.
Now if you ask me what each of those mean I would fail miserably at a test because I don't know, okay? I kind of know what they do but I don't necessarily know how to explain it to you, so Rene, if you could chime in, I'm really hoping you can explain some of these things to us please.
So, oftentimes when you get a download from one of these sites, your main texture source in Chief in the texture panel…
I’ll just pop in here, these are the images I downloaded from that site yeah so you don't just get the picture of the image. You get all of these other types of images with it.
So our main texture source, what Chief calls the ‘texture source’ is going to be called your diffuse map or your color map or sometimes your albedo map. So Chief calls it your texture source - that's going to be named something different when you download these. And then you've got your bump map - that's going to be a black and white, grayscale image.
So let's go look at that real quick so that would be this one.
Might be your displacement, they might call it displacement. they might call it height. they might call it bump…
The terms we got here - diffuse, displace, norm, spec and AO, which and here I use I did put the displace image under bump map.
… which you didn't necessarily need to do. Go ahead and delete it once and see what that texture looks like.
Probably won't be much different because this doesn't have a lot of depth to it.
And it already has a normal map. So a normal map is distinguished from your bump map in the sense that we get a left to right set of instructions from that mapping to tell us where there is height from left to right, as well as up and down. Whereas a bump map is just your overall as if we were laying a piece of paper on a table and taking a picture of it. That's what we're doing with a bump map, versus a normal map can - to kind of explain it in a simple way as if maybe we were taking a picture of something on a wall and we had some directional light that we were mapping from. So in that way we can give a little bit more accuracy in a normal map.
Your AO map is going to give you ambient, well we're going to occlude from ambient light meaning that when we have a condition where we don't have direct light, we have ambient light. We will create a shadow by masking to a black channel versus a white channel so your black in an ambient occlusion map is going to produce shadows where there is no direct light. And then we have a roughness map in our properties panel in this dialogue and that you know, you put the spec map in there. Spec's a little bit different but that’s well if it doesn't provide you with a roughness or a glossiness map then spec would be the appropriate thing to do. But sometimes if you're trying to recreate a texture that you're downloading you might need to take this into some kind of a photo editor and invert your specular or your glossiness map to get a true roughness map - totally depends.
So can I ask a question on this? So when you're doing this, you have to download all those different maps and then you have to put that file in the correct location? So you have to manually do it. It doesn't automatically come in like that?
No, the download comes with all those images, but I have to add them to Chief manually. Now we'll go do that in just a second, I'll show you how that works. The Chief has been doing more and more of this with their textures creating these other things that go with it. I don't know what percentage of their images might have these other things to make them look more realistic. Rene, do you know if you take your model out of Chief now and bring it into a rendering - I know you use a few different rendering engines - does it bring all of these other images with it?
It will export all these images as assets but you will then need to input these yourself into other rendering engines. It's very helpful to know where you're going to finalize your render so that you're not doing the work twice.
We talked about this in a previous show but I have my assets in a known location for that reason because now I point all my various software to that same location so that they all already have these materials stored in a library. So, I am duplicating the process but once I do it, once it's in my library, I can use it as many times as I want and whatever software I want.
When for so when you bring this into a different software and you your asset library is being pointed to by that new software does it automatically populate or do you still have to go choose each one?
I still have to go choose each one. It's a process.
It takes a bunch of work so you really got to want to be able to do this. You really have to be charging for doing high quality render views like I know you've done a bunch of those, so you have clients that pay you for that kind of service right?
Oh yeah, definitely.
Really doesn't work for free you guys. Cool.
Let's go create a material really quick in Chief and then put it on something again. Anything, any photograph can become a material so it's super simple to do in the first time I’ll show you how to do that right from Chief, but let's go and let's go into that website. And again, I don't know this person, I just found this site. I thought this would make a great topic to talk about so and again you can do it for free or for 14 bucks a year. It's like it's not going to break the bank. Maybe you get one good texture that helps you sell a job better. Done. Okay but let's go do some. What should we do, a brick?
Yeah, let's go do a brick.
They had dirty bricks. I did put a dirty brick in. It was pretty dirty. It wasn't as seamless as I would have hoped it would have been. In fact, I can show you that really quick.
Let’s go and get damaged brick. Let's see if we can get this to look uh pretty decent. So, I mean these are some pretty tricky things to be make seamless textures out of aren't they just choose one that looks great. I'm going to go download the file here now. It's going to download a really long file name. I would recommend that you make it shorter because you might run into windows file length limit.
Let's show one folder and that's opening up here so there's that file now so now. I'm going to right click on it and hit extract all and it's going to hit do that and i hit okay so there it is. So there's that file and again it's it repeats the name because of the zip thing but there's those images that it just downloaded okay.
So let's go make this a detail and make the file names longer.
AO, diffuse displacement, normal, specular, so those are kind of some of the things we were talking about.
Let's go create a material in Chief now. So there's a lot of ways to create materials in Chief. I'm just going to go simply to the library and go to the user catalog and right click on it, and hit new material.
Let me jump. That's kind of material is made out of a photograph, and there it is and so now I’m going to give it a name. Come on, mask it over here.
I’m going to call it Brick. And we're going to find the source of that texture, the source of that photograph is going to be back here. It should be this one. Okay so now we want to pick just this one. The seamless HR.
It would be diffused. It would almost always be diffuse base color or albedo.
Okay let's quickly diffuse and there's our Brick. Okay see how it puts it over the surface. Now we need this. We'll end up having to scale the size of the photo later. The pattern - if you're doing a materialist one of the questions that was sent me - How do you get the right size brick in your plan in block?
Okay it doesn't matter what the photograph looks like. What matters is what the pattern is, what's your pattern, so in this case it's going to be a city grid.
We could do pattern from texture but we're not going to do that, so here I would make my pattern 8x2 ½ or whatever you want to do. And that's what it'll print in a vector view when you do your elevations.
I’ve got a trick for the regular rendered view. okay if you go to your texture panel - and it's as simple as this - you gotta count how many bricks there are there, and times it by 3 ½ , and change it widescale. So you probably have about 17 first layer. Change your y scale to 45 and I bet you it looked pretty close.
What I like to do in Chief is I’ll put the brick on a wall and then I’ll draw a little 3d CAD box on top of the brick and I’ll make that CAD box the size I want, and then I’ll keep resizing using a rainbow tool. I’ll keep resizing that texture, that photo until I get it to match that CAD box so that's another way to do it. It works for me.
So there's our brick. So I mean it looks good and if we put that on something it's going to look okay, but let's go ahead and do that. Let's change our backsplash to brick so I’m going to do now is just click on the brick and spray that material on it and there's our brick.
So can we make that look more 3d-ish? You know give it some depth of field it actually looks pretty good the way it is?
I actually had a client that's using old used Chicago brick for a kitchen floor. Theirs becomes already cut in like half inch. They're putting it down and they're gonna put a coating over it. It'll be interesting to see that when it's done.
Shall we go add the other things to this material now and see what it does to our dust to this?
So let's click on the rainbow tool and we'll change that material. We're going to click command remember tool right here.
I’m going to click on that brick and now we're going to go fill in those other spaces in the material here.
Do you need to do this? No but let's just see what happens so if we go browse, now I’m under the normal map. So I would choose, let's go back to our details because the file name is getting cut off. Come on get over here.
So now I would use normal.
And what does the normal map do? Is it going to give it that depth of field or whatever you call that?
Yeah, that'll give you your left right top bottom height.
Okay and then let's go do the ambient occlusion. So, bump or normal either one, either or, right? we don't need to do them both. I've always thought I always had better luck with normal maps.
They're better maps usually. There's some advanced things you could do with both a bump and normal map but that's for another time.
And just to note, a lot of times from these sites you might get a 2k or 4k resolution texture. For the most part, Chief - you only need your supporting maps to be about 512 or 768 resolution and you can keep your main one up pumped up.
Okay. Now the roughness would be the displacement, is that right?
Now your roughness would be specular in this case.
And then we hit open there.
Do we need to make any adjustments?
No, like that yeah you're good.
Okay so when we click ok and that material will be updated now and it does put more room. Yeah look at that. Looks really good. Amazing. It looks like a 3d brick. That's really cool.
Keep that backsplash clean.
So, Rene, how does the light really react to that like if it was in a big room for a restaurant or something and you had a light shining on it. Is it gonna show shadows and stuff like that?
Yeah, it will. On the floor no, it won't cast on the floor.
No, no I mean if you have a light that the beam is hitting the wall and it's going down the wall as it cannot -- will it do a grazing effect?
It will on its texture. It will graze on its own texture. It will not graze onto the floor. Onto another texture, an adjacent texture.
You have a lot of textures going on in that room. I love a rough backsplash like that because that's so easy to clean. Just power wash it every year and you're good to go. Material looks really nice. I think that's pretty awesome. It needs to be a little bigger but it really looks like a 3d brick, so I hope that was helpful.
Rene you've got five minutes. We're probably gonna go over a few minutes today so go ahead.
I have this little image that I’m going to have to figure out. I got to figure out a way to make it available to you so you can make it available to other people. I'm bringing up a pbr ray trace right now and if you guys are doing any kind of symbol creation, if you're a cabinet vendor, you're needing to make your own cabinets, if you're just trying to figure out materiality on the whole in Chief, it's helpful to have some mapping tools.
And one of the tools that I use to try to explain how texture mapping is done especially on cabinetry is I’m going to just change edit this, i'm going to edit this cabinet texture and in my texture source I’m going to put a particular map that's in my catalog, and that is this textured grid.
I'll leave it up there on the screen just so you can kind of understand what's going on there, but we have some color coding and we have lettering and numbering and this helps us to see how textures line up on any particular surface within Chief Architect, so that if I press OK, what you're going to see here is it's applied across these cabinets. Now these cabinets are using a door style that's from a manufacturer catalog. And what we're going to see here is that manufacturer catalog didn't exactly, correctly map their doors when they created them. You can see here if we get in real close that we've got some stretching along this rail here right? So immediately we're being, you know this is the side of the cabinet, so the side of the cabinets are directly from Chief right?
It looks good. It's mapped. You can see here it's looping. So you can see that there is a cut where the face frame is, so it's looping. So this kind of informs you what's happening when you're creating your textures.
This also helps explain what happens when you change your material to global symbol map option, so if I go and use my rainbow tool again, or as someone else calls it the rainbow bacon tool, is we've got in our texture panel, underneath the offset and angle section, we have a check box next to global symbol mapping and we're going to show you exactly what this does when I press ok, you're going to see - look at that - isn't that clever?
It changed all of this to be uniform across our cabinets and that is in our texture panel, underneath the offset and angle section within your material properties.
Now I’d like to note one thing about this - in something that you may have not noticed. Yes, it's uniform but now, what we're noticing here is that our numbers are not turned. They're not oriented 90 degrees up on the rail so now we're pointing to another issue with this particular model. Right whereas we look at the slab door and the slab door is in fact so this can point to some problems you might have in adjusting your materials. If you're really getting into finite details and you need every little detail to be correct, this is a nice little tool to kind of explain and understand how these things are working.
Every Friday I try to put in some new free symbols in my website (rabbittdesign.com) and then I’ve got a shop and we're getting some new stuff in the shop. Someone asked me from the feed last time where do I get my art from, that's in the shop by donation. So if you guys want to go donate to the artists that created these, they've all been processed. You want to talk about some high-end kind of bump maps, I’ll throw one of these on the wall and you kind of see what it does.
So all these paintings have bump and roughness maps on them that are supposed to be true to the original brush strokes of the painting so, depends on you know if I get a an actual light in here, place it overhead, you're going to see just some of the detail that comes in out of it.
There's 53 paintings in this kit and you can choose your donation level and it goes straight to the artist and he'll keep making more stuff.
You can check it out and these artists are selling their art. Some of these pieces are fabulous. These are all to scale or are up for conversion and they also, some of them are even available for rent.
This is all one artist there's a little blurb of info on my shop about him. Check it out, these were painting from the 70s 80s and 90s. He was featured in a couple of well-known galleries and worked alongside some well-known artists. So he was a professor at Cal Berkeley, taught Art at Cal Berkeley. so yeah cool
Rene, thank you for sharing.
Okay. I’m going to answer these questions by you guys. Make sure you check out the new courses coming out over at chiefexpertsacademy.com. I would love to have you in our classes.
And let me just switch some things up here a little bit.
So Rene, you use doors to create your opening windows? How'd you do those?
Oh yeah, I used door, exactly. Those doors - I went straight to Anderson’s website and downloaded their CAD and then so the profiles and the frames and the sashes and everything are straight from Anderson.
They have 3d CAD?
No. 2d CAD. And then I just used that applied it to a molding profile and created some way.
All right let's answer these questions quick. George asked a single skin solid nine inch brick do you define as a mainly or exterior layer how do you determine the position of window door frame in a frame?
So George it sounds like you’re talking about how you create walls with different layers on them. In Chief, when you're creating those walls and you're defining them, you can have, I don't know how many layers you can even have now, you can have quite a few, you're always going to outside the wall is always going to be the top of the screen you're always going to have a main layer that could be your block. It could be your framing. It could be whatever. And the main layer is the part of the wall that will automatically when you put two walls together, they'll join you know they'll come together nicely based on that main layer. The thing about wall and I’m not 100 understanding the question, but the way you can determine where the door and window recess to, would be to sheathing or main layer. Now again it's going to be the main layer or the layer right above the main layer. I believe it is how that works so when you place a window or a door, you'll have that option in the window door to place it to the sheathing layer or the main layer. So if you want your window all to be recessed back to the block, you'll create that block as the main layer and sheat and then specify your window to go to the main layer. So if you have another layer brick on top of the block it'll come back to there. So that I think. that's what you're asking in this question.
One thing. A little tip about walls that you may not know about, so again everything in Chief starts with a line, including walls. So, when you draw a wall, you're drawing a line and the Chief extrudes whatever you've defined that wall is to either side of that line. You can define what part of the wall is that line in the default settings. Right now it's on the outer part of the main layer so if you go to your defaults and you go to your walls, so again you click on the wrench icon, you go to walls, you go to general wall, you can tell Chief which part of the wall lights up when you click on it. The outer surface, the main layer outside, the wall center main layer inside, our inner surface. So when I’m tracing over a plan sometimes or maybe a cad I have a cat outline and they've only used two line walls. I’ll set them to set my line to surface exactly and then when I’m tracing over a line so that the wall is now when I start drawing, it's see how it's drawing it on the outer part of the wall. So now it's clicking the line right there. So it's really handy when you're trying to do that when you resize the wall.
So if you resize the wall and you need to keep the interior the same but you want it to be thicker that way and vice versa if you want the main layer to stay in place and you want the you know the thickness of the wall to be well you can control that with that same setting I was showing you.
So let's do this real quick so let me just draw a line here on the outer corner of this wall and let me change the thickness of this wall. So it doesn't really matter which layer you change so if I go change this layer to 12 inches, and i click ok, Chief locked the main layer in place and move the thickness to the inside.
Now why did it do that? Because here in our defaults under walls, under general wall, the outer main layer of the wall is locked in place. That's the part of the wall that's being locked in place. So it's you see how it says resize about. So now if I have to go my inner surface and I do the same thing, watch what happens if I go set this back to a thinner wall.
So, if I could define that and I make the six inches, now we're going to see that the outer part of the wall moves. See it's going to give you a warning message now. And so now the outer wall, so the inside of the wall stayed locked in place but the outer part of the wall, so it moved the wall in now. So it locked that so that's a little setting sometimes when you're working on a plan, you might need to change a bunch of walls. That's one way you can control when you change it. So yeah, that's something to keep in mind.
Dan can you make the siding on that wall where you were doing the window thicker like two three inches and show how that window reacts with those different settings a little bit better?
Now we can see that the casing is become recessing back to what the windows checked as the sheathing layer. If I go check it as a main layer you'll see that now it's going to recess to the main layer. AO that's its part of the importance of using that wall dialog to define what the main layer is.
I got a tip for you too on walls too if you open that up. A lot of times I get asked about doing like a double-sided siding, double-sided brick right on both sides, and a lot of people don't know, when you click on any individual layer and then say insert above or below, it's going to copy that material layer. And now you're going to move it down the stack.
Yep I've noticed that one day when I was working on this, I don't know which version and I went, yes [Laughter] finally a copy button which you don't even see a copy button. They just make a copy of it because it used to be it would just put in a whatever default material but so that's really nice and then you can just move those layers down like Rene was mentioning. So now I would have siding on both, they'd be four inches thick and you'd be good to go, so that was a really nice thing that they did. So, it works well. Good thing for pointing that out.
A couple more things: brick joint thickness, user definable?
Yes and no. Depends - so when you're - okay we just talked a lot about textures and graphics so if I take that same brick and I spray it on the wall here, that really looks good.
The joint thickness is going to be controlled by the photograph. So if I make the photograph bigger the joints will be bigger. So if I go change the scale of that image and I changed the texture scale, so let's make that 200, yes it's going to stretch out the joints because it's I’m just making the whole picture bigger. But it might get pixelated.
It just might not look right. There's a lot of things to keep in mind there. The only way you could do that is change the picture, change the photograph, unless Rene has some magical tips on that one.
There they're all going to be advanced photoshop techniques.
Now on the other hand when you're in that material and you're looking for your vector views you can change the vector is mathematically calculated so when you choose a library brick, again you're kind of stuck with what they give you here in a thing like this unless you know how to change a pattern file.
If you were to open that in a text file and find which text item controls the thickness of that joint, you could make it bigger.
I’ve got a good one for you Dan. If you're going to leave that material definition up, then pattern from texture. And now we have the ability to do that from ‘change your source’ down to bump. In this case you didn’t add a bump.
This one is a little for X14.
Choose displacement then. Now you're just going to adjust your threshold.
We want to advanced.
Yeah go ahead and click advanced.
This will create your custom pattern file. Just keep in mind this really slows down your machine if you've got a lot of these.
You're going to have a ton of math going on calculating all those lines that it's going to create. I've done this with certain textures that have worked okay, but it's not working with this brick at all. Because it's just, it can't find any edges that easily. That's really what you're doing is you're trying to find edges. So okay well let's not get into that but good point, I didn't know that was there. That's nice to see. So, look for those bump maps which I think, that's going to be a better definition of the edges right?
What a bump map is.
The bump map will get you the best pattern.
You know for internal blocks so, I hope that was helpful about setting the sizes.
And then the other thing is a windowsill. How do you define a windowsill? Because Chief does such a crappy job of windowsills. That's just part of the program that they haven't addressed yet. So, if you want a sill to come all the way out, I haven't tried this the X14, but what I would normally do is I would draw, I would do a crop section through the window and draw a box of the sill that I want and I would attach that to the window and usually it worked. Otherwise, I’d have to do it manually just place windowsills manually. Do you have any tricks on that one Rene?
So, you would go into sill, and you would go use interior. I'll use exterior sill or your library. I think I had some in my user catalog.
What was the problem. I missed the problem?
It's doing a custom sill. I'd love to know how to do that, but like I’ve never been able to do like stone on my sill like counter top material on the windowsill. But going all the way back into the window I can attach it to the edge but you can't get it all the way, the full depth.
So you see this profile that I just selected? You see how it's attaching it to the outer surface. You have to draw the seal the exact size that you want. You can't change the size of it here. You extend it and send it but you can't change the size of it.
Well and it's sitting incorrectly. It should be sitting flush with the window, the frame.
So you can hack this together and make it automated through using a shutter and symbol as a shutter with a bunch of offsets.
How do you know this? Oh my god Rene your brain works so different. You know if you were a gamer he'd probably be on the circuit as a pro gamer.
The bottom line is draw the shape you want in full size so do a cross section through the window, I’m using the back clip. You'll go right to left, you want the left side of the sill, you want the back side of the symbol to be the left side of the screen. Draw the size you want, give it the shape you want, add it to the library, attach it to the window as a sill. I’ve had some success with that. It does work most of the time.
I think we need to go, we're already 20 minutes over. Gone over this much, you guys - thank you for being here.
It's been great. Thank you.
I know one of the problem bricks and the materialist is correct. I don't know.
Measure your draw a 10 x 10 model or draw something 10 x 10 and see what comes up. Just draw some samples and practice with those samples.
So you can set the definition of that material square footage in your component classification?
That's right. So you can say for every brick is so many square feet so you could calculate an area and then automatically divide it up into those bricks right?
Yeah, exactly.
Okay cool. I don't do materialists in Chief. That's just an area I’ve just not explored so that's the class we need to talk about someday, because the program's getting there. All right, cool. You guys, thanks again. Be sure to check out our new courses that we've got coming up. This should be a lot of fun. Robin is a great teacher; I had the pleasure of teaching a couple classes with her already and we've had a ball and I think you would enjoy them very much. So you will get access, the dates and everything are there again at Chief Experts Academy. And you can go to the store, click on the home page and you can click on the Learn More buttons here on the homepage, and find out more about the courses.
There's a coupon code available. I’m going to send out a coupon code.
I'll be sending out some information on those. Thanks guys. We'll catch you later. Have a good weekend everybody. Take care, Bye.
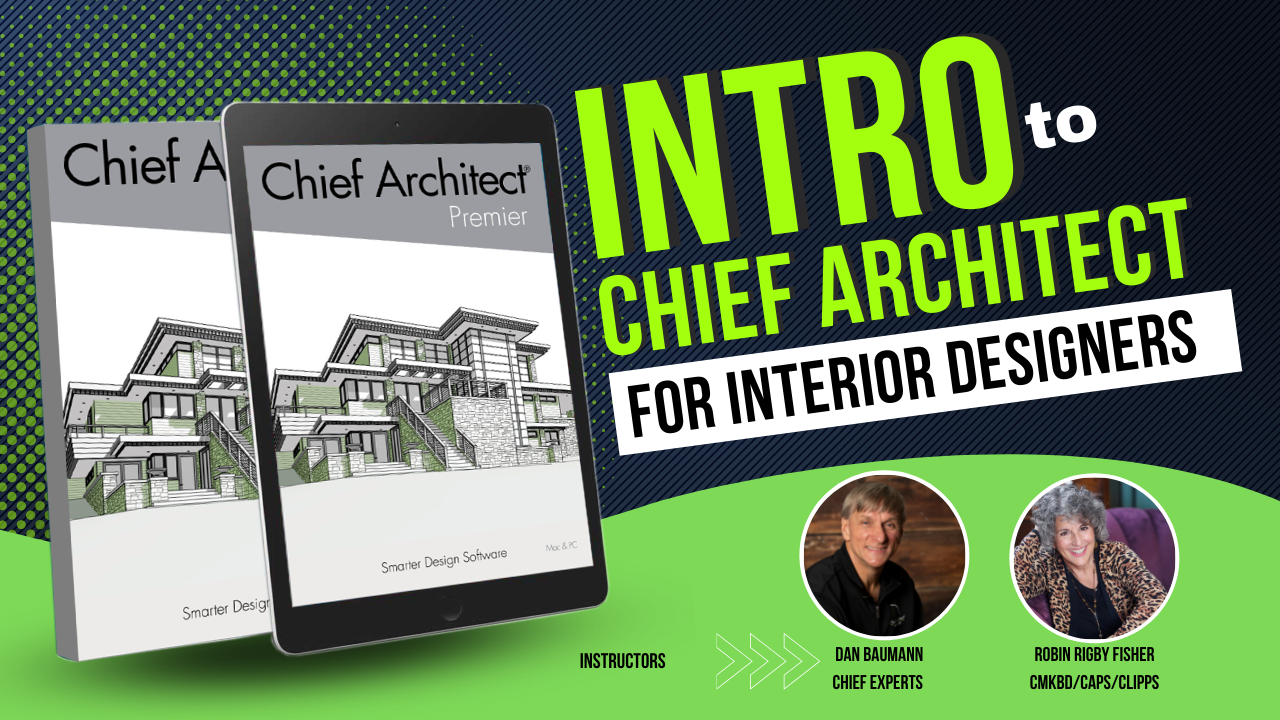
Intro to Chief Architect for Interior Designers
This course if perfect for interior designers who are new to Chief Architect.
Spend less time learning Chief Architect and Take Your Interior Design Skills to the Next Level.
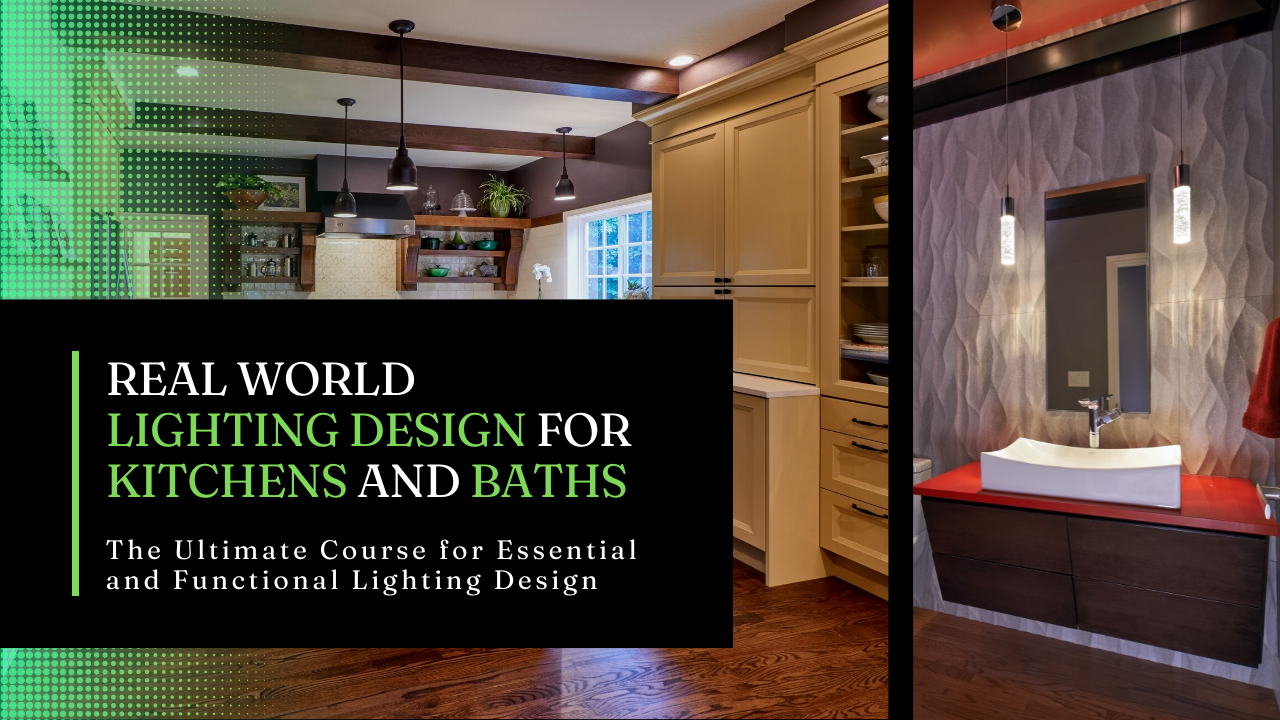
Real World Lighting Design for Kitchens and Baths
The Ultimate Course for Essential and Functional Lighting Design
Discover the best practices for determining what type of lighting is best for an amazing residential kitchens and bathrooms.