
We'll give some of the highlights of things we've been teaching the attendees at the Summit.

foreign tour in Dan's tour of the facility where we're doing our chief experts event but uh unfortunately I think we've got technical difficulties can you hear me all right John yeah okay um how's it going everybody Welcome to the designer show uh we're gonna hopefully get Dan back from his um you know freeze State at some point once he realizes we're not doing the tour with him but in the meantime let's talk Chief we're always going to be as always welcome thank you from wherever you're coming in from if you've got some particular questions you want us to answer on the show we're happy to do that we're happy to stop from what we're doing and come back and answer some things uh Dan would usually be back here and we're gonna we were going to do a little bit of spin the wheel but in the meantime I'm sure you've heard us talking about it or heard your colleagues talking about it but we're starting to get into some of these new AI platforms so there's a little bit about what we've got going here so we're going to take a quick trip into my kitchen here where the true audio is not good say that again okay we're okay so we got we're in the kitchen I've got my sister Linda and Ava Patty Doug we're gonna go into the kitchen so you're gonna have to walk around let's walk over here so this is uh we're in the dining room at the house in the summit on your Outer Banks and this is where we get all our food you say hi to Avis and Patty it's a John's wife Patty they've been doing a fabulous job preparing our meals for us let's walk into the kitchen for a second and here we are here's the crew hard at work here's my lovely sister Linda and my lovely sister Mary and they are cooking up the storm for everybody and since they're just Champions the comfort of the food stay for the training really works there's no audio here's my brother Doug hello let's head down to the room see if we can get this to work the audio's up all right I'm trying I wonder why it's got to be the internet I'm on now all right so let's head down like I said first time we've done this so we're trying our best all right let's keep going so much and Chris if you could uh when if it's working at all then someone's going to ask a question we should try to film them so I'm filming literally on my phone okay so there's Chris holding my phone and we're getting some internal signals here but anyway welcome everyone guys we got John Renee on the on the call here I don't remember what happened to Robin disappeared so welcome to the show are you hearing okay coming through loud and clear can you hear me now you can hear me now I can't hear you not we're picking up background noise somewhere huh how bad is it okay are you guys out there in the field are you hearing us okay get a message in there let us know what you think we'll try to mute ourselves as we go and here's everybody in the room I think you can see it in the bottom left corner or bottom corner or wherever you're seeing it on your screen all right so what we're going to do today is we're going to have some fun uh asking everybody here Chief questions so you've seen us spin the wheel before so what we've done is we've taken and we put everybody's name on the Wheel and we spin up the wheel and they get to ask a question about Chief Architect and we're going to do our best to answer it so if you're not in the room just raise your hand but if we spin the wheel and someone's out in the room let me know you hear me okay John on the on the audio okay cool because I can't hear you all right Diane gets to ask the first question and I'm gonna go ahead and hide that choice do you have a question for us Diane that we can answer about Chief Architect okay hang on one second Diane um I'm going to ask you to oh no wonder I didn't have my left L mic plugged in I'm not sure which one of these is working so uh talking to this Chris can you hear through that mic okay is that one good let me be with this other one so go ahead and Diane ask your question please when you want to do a curve at the beginning of the staircase so when you when you put some stairs in your plan and we're gonna have a couple of stairs here and we're just going to run them both oops I'm going to run them both up I'm going to take and start bending this first one now I tried this before and it didn't work but I'm just going to grab that bottom button with my right Mouse button and bend the stair and then I can just hook this together I'll just use my snap tool to snap this spot into that oops I missed we'll snap this into here and here and that will join it together now you've got one staircase so that's how we start the stair with the bending on the bottom is that kind of what you're looking for all right cool good question John and uh Renee you got any comments on that looks fantastic yeah all right so so when we are in the same room we do get lots of feedback don't we yeah that's the first audio I've heard you know I didn't have my lapel plugged my mic plugged into my my receiver yes anyway let's go ahead let's go spin the wheel here we're having fun all right Chris Jones the man running the phone laughs okay let me give you a simple two-minute explanation of how to do terrain uh terrain is one of those boxes in Chief Architect that uh you can Contour you can slope and make uh add Hills and Valleys and holes and all sorts of different things so what we're going to do is start out by going to our model I'm going to put the Train on the first floor and I'm going to click the button right uh where'd my train box go right here we're going to click that and then we're going to put a box around our house the Box will kind of be as big as your prop you know is what you have drawn on the screen that's going to create a 3D box so let's bring up a 3D View and I will tile my display and I got all box up there let's get rid of that so there's my Trend first thing I always like to do is open its dialog box set I like to change the thickness so it just looks more substantial so I just go like eight nine feet and then we're going to go to to the uh I never use flat and plaid but I'll uncheck automatic and I'll set this distance here to be where the top of the train is in the top of zero on the first floor is that's that that's what that number is so right now the terrain is 20 and 8 inches below of zero on my floor button you notice you don't put a minus that in front of that this is the one place where we don't do that with our slabs so that's what that is so now when we look at this we'll have a box that's flat 20 inches below the zero floor height in our plan so what I'm going to do is Contour this so that the backyard slopes off so let me just pull this out I can do this with a couple of real simple boxes so let's just tile this blade by grabbing this and what I want it to do so I've got the the basic front of the box where I want it and I I tend to put that that height right about where the garage floor is so I haven't checked that I'm not sure if that's where it is but what we're going to do is add some contour lines so what we're going to do is add some elevation regions these are really nice they work really well and we're going to add those so um I don't use points you never use points unless you have a grid that you're working with elevation lines and splines work okay if you have the terrain map where you have the Contours on it but for simple uh job of just doing like a walkout I'm going to use an elevation region I'm going to start by drawing an elevation region on the front of my box oops that's not what I want wrong tool I want where is that here I did oh I'm sorry this one elevation region I had gotten an uh item so I'm going to put a box there I'm going to put a box here right near the back of the house and I want the yard to keep sloping a little bit on the back so I'm going to put one out here as well this is about as simple as it gets so the front box so right now the top of the train is its own zero it has nothing to do with the floor height has nothing to do with the zero on the floor height and so what this what I'm going to do now is leave that that box alone because the height in that box will still be zero that's the first thing so I'm going to keep the terrain where it is in the front then I'm going to click on the second terrain region I drew and I'm going to open this dialog and I'm going to set that at about minus minus nine about eight feet I'll go eight feet it's going to drop down and what you'll see is we'll get a big dip in our Terrain okay because now the front is set to zero the box I drew here is set to minus eight feet and then of course it's going to come back up to zero as best as it can but I don't want that I'm just going to keep it going down so I'm going to set this one at minus we'll go minus 10 feet so that again has nothing to do with the floor and ceiling Heights then I go like that and there's my nice Contour sloping down that's a nice way to get that going of course I need to change the footings on my garage and that but there you go that's a simple way to Contour a walkout for a house if you're trying to do that that help a little bit okay we'll get into more about how to retain walls and things like that but not on this call all right John Renee you got anything you want to talk about are we hearing you yeah oh you can have it so I would have to mute myself it's going to be a same room yeah okay so you would have had to mute me and then unmute yourself to make it work or I would have to mute myself okay well I'll keep talking let's spin the wheel next question if you guys out there uh have questions too type them into the sidebar and John can ask those questions Mike where'd Mike Go there he is here hang on a second peek into that please you hearing that John when we use that Mike you can hear that one okay good you ready go ahead oh yeah thank you all right so take a base cabinet go to the component dialog box and I want to know how to add a component in there that will report to a material list terrain no from the from the cabinet oh from the cabinet okay that's a Renee question all right you guys have been working on that Dan you might want to repeat the question you don't repeat his question to your mind for the audience um okay that's that's a me question you can hear me okay and we got my screen out perfect so what we're talking about here is we've got a base cabinet up on the screen I'm going to open this up and then we have a components panel in this components panel we see what the various components are that that we've we've got already associated with this cabinet so one of these components is a drawer door so we've got several different classifications we can add to a particular cabinet we can do it by adding a drawer I probably need to know more about the question to understand what we're adding here but everything can be done from this component section in fact we can even hit the plus sign a couple different times and you see here I don't know if you can see this of course I didn't scale my screen what's it got in there so I hit this plus symbol and that gave me an accessory two here and so that accessory too can report to anything and we can add in descriptions and this is a delete that hidden hinge and see if you can add it back out well we can but it's going to be an accessory and then that accessory we would classify it as a hinge again I really want to put me on the spot right now so we're going to put in Hidden hinge or it might be that we've got you know an object-specific field that we can get into I'm not sure so I don't mess around with materials that much but we can just type in what we want to report and you can type it into whatever reporting category we might be bringing into materials so we'll just do this as a test this is going to be our test item let's see what it reports do in terms of material lists so I've still got this selected and in my edit toolbar I'm saying calculate materials from region and do we in fact get that yeah we get our accessory one accessory two Etc I'll let you change the name yeah and then you know we did that in the components tab of our of our cabinet itself so that's a little bit you know more complex than we usually get into in this show but I appreciate the question all right okay so I'm back again this is kind of fun it is a little it is yeah we've never done this before all right let's go spin the wheel and get the next question and John do we have any questions from the audience okay you're talking about the cad stretch tool I'll cover it so the stretch tool all right when you have a cad when you're drawing things with CAD all right so you've drawn a detail and I'm not going to open a detail or anything I'm just going to draw some things so I might have uh drawn up a cad thing uh all right let me just do this and so this is a cad detail this I'm drawing a bunch of CAD lines and I need this to be longer and I I want to move it all at once I want to keep I want to stretch it from here over all right so what I sometimes I'll draw a line where I want to do it but it's under edit to pull down to meta hold on edit and it's called um edit and it's called stretch CAD all right so I'm going to click on that I'm gonna draw a box around the area I want to move so I'm going to draw it's kind of like it's just like edit area for your house except for CAD items so I'm going to click on that and then I could hit transform replicate or I could just grab the handle and start moving and hit tab I'll just do a transform replicate and I'm going to move that item to the right I'll go six feet and it's going to stretch that whole CAD box out and keep it all hooked up it moved all the other elements in that area over six feet and that's what stretch CAD does if that's if I got the right tool was that the one they were asking about I get it all right that's stretch CAD it's really handy when you've got a bunch of details you need to make them bigger um all right let's go spin the wheel put the pressure on everybody in the audience who's going to be next and Jordan base computer to look for either laptop doesn't like any type of like a Target system requirement for the for a computer obviously we're all computer-based here yeah all right let me talk about computers for a second um done we're getting feedback when we're getting feedback we're good now oh thank you so when you're buying a computer uh you want to look for the right components you know there's a there's that fine line between budget and power and speed because the more powerful and the faster the computer the more it's going to cost is bottom line so the latest Hardware out right now is RTX 4090 uh video cards which are about the size of a large brick they're really large and they run anywhere from 1500 to over 2 000 and more for that card depending on where you find it uh you're gonna want the latest processor um right now the latest processor by Intel is the I9 core the court um the Intel I9 third generation 24 core processor and so Renee does the does chief use all the processors when it's rendering and doing its thing um when it's doing no it does not not at all so only time we're using all processors is if we do a CPU raytrace which a lot of us aren't doing that anymore and just let you know we're sponsored by AMD for some of our machines here we're hoping to get it okay okay um we're trying to get a hold of a 7900 XT to compare it to the 4090 and I know we're working about around a couple driver issues with that so we can get it up and running and test it out so there's there's one aspect of it but yeah CPU raytrace and that's going to use all cores over CPU so we're really not utilizing multi-core for um for chief right now not really a lot of things are graphic intensive even when you move your plan around on the screen that's still the graphics card for the most part so it's it is important however to get a really fast hard drive and I would recommend an nvme so Nancy Victor Michael Echo nvme M2 slot drive that's going to be the fastest on the market pretty much and if you get a motherboard that's got a PCI 4 slots on it and you can even upgrade to ddr5 would be the fastest of the fast right now but that's not necessary for chief we can get a lot done on some of these older machines if you don't want so in the newer Ray Trace settings but I'd say at least start with if you're going into the Nvidia Market uh at least start with like a 3700 should be your base plane if you want to do some renderings at this time we've got a question that tied into that last cabinet question from someone here I'm going to just pin it to the screen if you insert an accessory into a cabinet will update the comment components like a rubber shelf item I'll just show you I've got a suite of tools that I've made and and one of them is just it it creates a garbage pull out after a single click now after I open this item up we're going to see here I open up the drawer we've in fact applied something to the back side of this cabinet face and so if we open this up we're going to take a look at that same components panel and we're going to see here in my list to the left here is I've got that insert so it does report it does report as long as it's in the component list and you can modify it here and you can even add in your own pricing to this particular component and then when you calculate materials for that room you would also see that here's my drawer knob I've got drawer Glides and we've got an insert category here so yes it does if you're applying something to the back side of a door or drawer it will report to a material list nice thanks thanks Renee good answer yeah Hardware's are a tough thing because you can you can buy laptop for 800 that'll run cheap just fine but you're gonna have a hard time doing the rendering um or you can spend 5000 on a laptop and you'll be able to do the rendering achieve just fine so there's everywhere in between there so you're just looking uh the main thing you're looking for to run Chiefs uh the rendering that it's getting to be known for is a good video card you know the faster the better just get your budget in line and you can get that I just built the whole brand new computer with the with the RTX 4090 with the 120 Giga Ram a really nice video car a motherboard I mean all the latest components uh the only thing I didn't do is a ddr5 I just went for ddr4 because that saved about eight nine hundred dollars and I spent about four thousand dollars on that computer but I put it together myself so it's kind of fun that way someone's got a comment here about the crash and just to note there has been if you're in a Windows 11 machine there was a recent driver update so if you're having crashes um we knew about that driver crash and so you might want to go check and see if you've got the brand new update that just came out because people were having to roll back their drivers to the November issued driver but we just got an update I think maybe about a week and a half ago or something like that so maybe check that out if you've got a brand new machine update that driver and then hopefully that'll mitigate the crashes foreign driver that's a that's a video card driver so you want to look for most of the time you want to look for the GeForce experience software download that and run it so you go to nvidia.com and search for the g-force software GeForce software that should take care of it does a good job fine if searching for and finding the right drivers for your computer all right let's go spin the wheel how are we doing on time is it we got time I borrow that Mr Kevin Mr Kevin we need the mic and we need to talk to Mr Kevin over here Kevin tranzo is here working with us and he's helping some of the clients at the show here with some little bit of business coaching and things like that so he's really getting into that but Kevin what's your question so this message is brought to you by your sponsor what would you say is the single best business decision that you could make this year and I just pitched it to you I just tossed it right just threw a nice softball right to you yeah you're talking about me not you in general there you go and we have a couple or one bunk bed left and we have uh if you want to stay at a local hotel we have room for three four more people so it's on the website just go to chiefexpertsacademy.com and you can find that for next week yeah starting starting Sunday this coming Sunday you could you could do that thanks Kevin if I would listen a little closer I would have caught that all right appreciate it uh let's go spin the wheel again or do we have another online question we can answer what do you think John next I'll do a question then you're next okay let's go spin the wheel we are actually having a ball at the summit here I mean everybody is fabulous and fantastic we're sharing ideas left and right it's really been something else and we've got Amy up all right Amy answer but what is Ray Trace what is Ray Trace all right Chief has multiple ways to display uh your 3D views all right the it used to be the only option we had was Ray Trace now we have an option where we can bring in a camera and we can switch to the option called physically based people call it PBR and this is the new form of Ray Trace in Chief where when you rotate your view it's going to delos real quick all the dots are going to go real quick and you can you'll be able to get a good view of what you're looking for of course I don't have a very good plan here we're just doing some stuff in our demo plan and I just ran into a wall or something I don't have my hang on let me get a different View so depending on your Hardware this can work really quickly I mean again I've got a pretty good machine here so when I switch to the uh to the rate physically based it's like bam it's done and when the right lighting is in there when I have Windows in the room and things like that you're going to get a really nice image now if you don't have the hardware that can do this you can still go into a standard cat camera view the render View and we can run the raytrace and where is that now I don't even remember um how do I get to that Ray tray so it used to be a camera on the toolbar here is this it there it is so this is a different one where it opens a menu and you you have to wait for this so you can launch the assistant well I haven't been inside of here for a long time so we can go next and then we can make some of these setting changes and go next and I'm not going to click anything I'm just going to click through and hit save or hit raytrace and that's going to keep going through one screen at a time and each time it's going to get better and better and better and better depending on how many samples you want to take of this and over time you might get a really nice Ray Trace now if again if you have the hardware that's not supported by Chief Architect this is going to be the way you're going to get those photo quality so I think all Max is that the case for you Kevin for Ray tracing you have to use the raytrace on your Mac to get those views so it's going to use CPU raytrace that doesn't have real-time Ray tracing like it does for Windows I think Apple has not lived up or fulfilled what they said they were going to do or some I'm not sure what the whole story is but you can't do it on a Mac um and then you know if you so if you have an older computer they'll still work but it might take hours to get a really good rendering I mean I remember the days when we used to sit for you know let it run overnight to get a real nice rendering and hopefully get up next morning look at it and it's nice or it's bombed I mean it's like so it's come a long way so it really has all right let me get out of here and let's go uh let Renee answer he's got Renee's got something really cool to share with you guys so Renee why don't you take it away good all right uh okay so I'm let's see what screen is that that's still Dan's screen let me get mine there we go there we go so I'm sure you've heard Buzz around the office we're talking about AI all over the place how can we implement it into our businesses this is a popular website it's called it's built on open eye it's called chat GPT I'm sure a lot of you have heard about it and uh just gonna do a quick implementation of why you might even use this AI based website um I'll just do an example a conversation with chat gbt and what I'm going to have it do is write me a disclaimer to verify dimensions in field on a an architectural set of plans so we're oh screen okay full screen and sometimes in chat CPT just keep in mind if you've let it idle for a while it you do need to refresh it that's an experience I've been having with it hopefully that they fixed that over the time so let's see write a disclaimer on uh verify depending while I'm doing this to verify in field dimensions for an architectural thing set of plans so this is initiating a conversation with the AI and you can see here it's writing us out a disclaimer that we can be using on our plans and this isn't just a linear approach you can have a conversation with this Ai and use this in your practice I've had this AI rewrite everything in my website if you've seen my website recently every field that I have in my website has been Rewritten by this so this is kind of an informal letter you can tell it to write it more formally I'll just um I'll say here limit to 300 characters and it's going to rewrite that section with a base cap of 300 characters so this is a really powerful tool for writing any kind of sections now mind you this is just coming out from AI you might need to you know consult whoever you need to consult about what you're including in your plans but this is a great starting point for coming up with some of this stuff so um yeah we already see a plan here that's you want to post pin that one holy crap that's cool absolutely this is very cool I'll even show you another use for this and and mind you you need to have a base understanding of how macros are written but let's have this write a ruby macro you replace the text Evan transu with Global Superstar it's going to sit here let's see text Kevin Transit Global superstar in a ruby string variable here we go so we're going to use the G sub so it's explaining to us what method we're going to use to create this and then it even gives us some example code and we have the ability to copy that code and try to add that to our Chief Architect you know Ruby strings can you uh can you explain to people what ruby is well no problem I'll try to explain to you what ruby is Chief uses a version of the Ruby scripting code in all of our macros but how about we just say explain what ruby scripting is and there we go this is going to start typing typing out Ruby scripting so this is this is a fantastic tool not not only to just come up with content that you might you know be having trouble coming up with but there we go his name's Michael right isn't that Michael is that his name yeah he's fine anyways I'll let you guys play around with that I hope you bring us some cool stuff that you may have created using this because we'd love to hear more about it we're all ears about how you might be implementing this into your own practice so please come around I will tell you one of my favorite ones was um write a love story in The Voice of Yoda you can try that for yourself but uh this is you know this is pretty fun I can kill a lot of hours on this so I haven't been getting any work done lately but it's been it's been a good week so far there's no cost for this although this week I believe they rolled it out this week that they do now have a subscription service the subscription service gets you um higher bandwidth to their servers so there might be a time where we've got a lot of a lot of traffic to their site where you might be held up or be waiting on something so they do have a subscription service now I believe it's 20 a month um I'm going to pay for it because I use this a lot and it's already saved me money and and it's done a lot of great things for me already so there you go we might have to post this in somewhere where you guys can read it because it's probably a good story thanks Renee that was that's really cool I mean I've just sat here with Renee last night we were sitting there doing this very very cool so yes definitely wouldn't look into this but if you're writing anything a letter a proposal an estimate uh you know contract bam write me a contract for how to sell Design Services you know that don't probably don't say write me one but anyway that's the idea of course wonderful it is all right let's spin up the wheel you know show Kevin to us Renee you know show the Kevin Kevin in the kitchen to us yeah why don't you why don't you gear up for that one too Alice uh she's sitting there don't ask me don't ask me um I have a hard time tracing where the default materials originate in in a in a object um how do we Trace default materials customized customize something we want to change it or let's say we want to figure out where does the default material for this um wall assembly come from how do we Trace that back to the setup Renee is going to enter that one he's our material Guru Okay so I want to want to throw me back up on the stream so everybody can see here there you go all right cool so in our default settings in our plan now this is always going to be plan specific so plan specific is where we get our materials we have a material section here and if we're I mean this is where all of our default materials live except for a couple things like um like your wall types your wall types are going to live in your wall type itself so your default wall type are going to drive your materials for wall types and there's a few other classified objects that have their own defaults that are in plan but these are going to be where all your base defaults live so in my template plan I have um for instance I have the the flooring material that I have running throughout my project is I have a different version of that flooring material applied to my stair treads so you'll find them in the material defaults here now if you're talking about the root files where those exist that's a different story say you're importing something into your plan say you want to bring a catalog in from somewhere else now out of the box default in preferences um and I might have to look for this because it's been a minute let's see I'm going to be in general um here we go so in the general panel and then the sub panel called file management second to last section is auto copy files and by default this is checked copy externally reference material files to my data folder so your data folder every time you bring in a catalog file that's maybe produced by someone else maybe you're downloading some of my stuff and you're bringing in some of my stuff it's going to copy those reference material files into the data folder and if you want to know where that data folder is you can get into the folders subpanel let's click to show all paths and here is where we're going to see all of our you know specific folders the great thing about getting to this from the show all paths method is I'm in Windows Explorer so it's going to say show in Explorer we're in a Windows PC here so my core Library database folder if I want to locate this then I can choose one of these selections and click on show and Explorer and it's going to bring up my Explorer window so I can see where that's located now that's off screen for this particular case but if we were to uncheck copy externally reference material files to my data folder then if I'm going to go into an object and locate where it might live that material file will have a long URL path so let me pull up a camera view so we can see what that even looks like so I've got a drywall material here let's say for instance I might have a bump map in here I might have a bump map here that's located on my machine somewhere so it's going to remember this long URL so that way if you're working across multiple machines or you're working within an office if this long URL doesn't match up it's going to be missing that material file so that that kind of Tails into another big set of questions that we could go over for the next half an hour so that's the starting point though is is we're going to get our material files if you have it auto check to copy externally referenced files that's going to be in your my documents folder where all of the rest of your Chief files are at uh do I always Purge a used materials on Project I will tell you that if I'm working I don't always Purge um it's it's nice to purge um I do Purge in my template file so I'm not usually adding too many uh additional files um there there is a tool let's see it's in the 3D menu materials plan materials this is going to show you all the materials that live inside of your plan and what we're talking about here is if we click this purge it's going to remove any materials that might not be used in this plan so if you're doing something where you're creating a new plan you're building on a whole house and you want to save that as your new template file you might want to go in there and Purge materials and that just kind of cuts the the file size down a little bit okay Dan you're back on cool get out of here all right I am back on thanks Renee good answer I mean there's as you can see the materials are very deep in Chief they're all over your computer and that's what happens sometimes when you someone gives you a plan and you open it and you get this message that says there's no material here can't find the material can't find the PDF can't find these things because Chief is reading all those files so it can display them in your plan if they're not there you're going to get error so that's why you want to be careful in the little FYI tip for you if you are taking your plans somewhere else and like you're going to send them to someone you want you want to go to file and you want to use this option right here called file backup entire plan this will this will make a copy of your plan and all of the materials that are in your plan but even better than backing up your entire plan if you have your layout done or put together and you have on your layout you have your plan you have a PDF you have your as Bill plan you have details from another source if you do it from the layout it'll copy everything that's on your layout into a folder and when you open it on a different machine all those things will be there so that's the recommended way to send files to someone it'll create a zip file that you can send use a service called wetransfer.com if that file gets really large I use that all the time it's a free service where you can send up to two gigabytes of information for free at a time so up to two gigs for free wetransfer.com great service and check it out I use it all the time all right let's go spin up our our wheel again you got about what 10 minutes left 15 left cool we're getting now Margaret welcome Margaret what's your question today how and where and when to use the object eyedropper all right that would be one where we'd want to replace something in a room somewhere else so objects you know like materials in Chief when we use the material eyedropper so I want to put that countertop I want to put that countertop somewhere else and I could spray that on a different surface okay so that's you hit the eyedropper it turns into a spray can you can spray it on something else now let's see if I can find something that I could actually do this with so um well let me just show you what happens when you use the object eyedropper and you click on an object you're gonna click this little button down here this one will allow you to choose which objects you want to paste which items you want to copy from the item you selected and paste somewhere else so unlike material where it's one choice here I have a whole bunch of choices okay so I've got a lot of choices so that's just from a window those are all the different elements of a window so let's say I want to copy the uh I don't know the trim the molding the trim what do they call that casing I want to copy the casing so I search for that and I'm going to I'm going to use the casing I don't see it on here is it on there why do I have both oh yeah it does have all those rough openings I never use this because it's too complicated um too many too many choices so I would but if you were gonna use it I'd hit clear all most the time you can search for something and you know pop right up I use actually let's go to like a room dialogue so if I copy something from a room object from a room that's not how I would do it either uh I'm not doing a very good job answering this because I never really use that option but basic bottom line is you highlight something click this item down here select what you want to copy usually I would hit clear all select what you want to copy and then go click on the object you want to paste those items to that one so you want to change the handle on this cabinet to match this other cabinet you would use that option copy object and paste on another cabinet so it works just like the material painter but for objects of an item bottom line anybody else here use that anybody we're going to use that huh do you use it a bunch okay on CAD stuff use it on CAD items to change layers and things like that yeah that makes sense you want to talk on that Renee go for it unmuted Okay so let me get a window placed in here so I'm going to actually place a bunch of different windows and we're going to save all these other windows we can see that these are all you know single hung double hung whatever they might be I'm going to switch this one window to a casement and so I can actually go in and you can see this is single casement versus we've got single hung here so here's my single casement I'm going to hit my object properties tool grab this and then I'm going to clear all and I'm going to look for type and then I'm going to grab this single case bit now I have the single casement it's loaded up in my object properties tool the thing I love about this is we have a marquee mode in plan so I can and this is my edit toolbar usually at the bottom of your screen I'm going to click on this Marquee mode which is this one right here the yellow one and then if I click the draw Marquee over those windows you're going to see there we go it just changed it to single casement single casement and it left one left over so there we go switch these to single casement and left this one as a single hung so a couple different ways you can use this now if I've switched this to a plan mode and I clicked in the room you can see here it's highlighting and it's going to affect everything in the plan as soon as it is showing us whatever it will apply to um based on highlight so if I click this in the room now there we go I did it to the entire plan it changed every window in the plant into the designation that we've picked foreign cool Renee you explained that a little better than I did nice job like I said I don't use that tool or else I grew up with Chief without having that tool so I guess I'm used to not using it all right let's go spin up the wheel for another question and we got or do we have the audience have any questions foreign let's go spin the wheel Carolyn is not here all right nope I should have left around there Marissa here nope she's not here Mariah what's your question Mariah besides it when you send a live camera view to the lab it comes in yes oh yeah that's one of those things in Chief I wish they would change so if I go open up a layout if we go up in a new layout here and I send a 3D view to this sheet let me switch that to a sheet that works so let me just tile the display here and I'll just send this view over there okay so I'm going to send the layout oops not save it I'm going to send the layout um actually let me go to a different View what is that there we go send the layout I'm going to send the current screen and update always or I always I like to do update on demand but that's your choice so there's that view what Chief does by default when you try to move the corners it resizes the the viewport okay and you don't want to do that to resize that you have to hold your X key down that's your resize button and now you can resize it just like any other CAD box oops I've told Chief a number of times once you put a separate handle on there that allows me to grab that and resize it and get my X key held down see now I can resize it like that so it's the X key your right Mouse button will also work I think yeah so you can resize it that way a little bit too but and you can also click the resize button which is the one right here this button right here that you resize that's the same as hitting the X key that little button right there and that's hmm uh this one that doesn't resize The View you can't resize the Box that just that just fills the screen in your box as much as possible is this I don't know what this is what does that one do let me click here oh I am our night oops um so this button right here does what nothing it that fills this the view but anyway X key remember your X key I have I have someone call me and uh said they return Chief because they couldn't resize their views and I said well just push X key and they go oh oops I think they might have one got Chief again but it is one it's it's kind of like a hidden thing it's like come on might make it so stupid anyway maybe the programmers are listening probably not uh question let's go back to our wheel real quick how are we doing on time a couple more you guys are asking great questions thanks for doing this it's kind of fun having a live audience that we can actually see Emily and I have a very specific angle that I want to get but if I go out too far I'm in another room or I'm in the wall how can I get that without deleting the walls and messing up all the lighting what is this what is it you're trying to make a specific angle like if I want to get the image of a countertop but I can only get it from a certain angle but if I go out now I'm outside perhaps oh okay you wanna you wanna do that Renee sure go for it all right so I'm going to handle that one a couple different ways we can do this um if we're going outside of the house like fully outside of the house we've got an option in our 3D menu and so in our 3D menu under camera view options we've got hide camera facing exterior walls so that when I exit outside the house and it's working correctly let's see if I can refresh there we go refresh that shows that as we pan around this it's going to make those exterior walls disappear from this angle so that's one method of doing it I'm going to turn that off another method of doing this is if we go in and edit our active camera and see if I can even get into that my toolbars are so shrunken if we edit our active camera which is the same Button as edit active View in this dialog box let's see you know what field of view and Grill I'm a little bit off here let me edit my active camera toolbars are all blown up and now I can't click on anything Let's see we should have a clipping distance here am I missing something there it is under the camera right I don't see it though another option that I like yeah take it over if you can I can't I don't know yep let me show my screen here real quick another option am I the right one is that the right screen no yeah no oh yeah go to achieve let's do that so another option that I like to use effects in a house and you want to see a bathroom or something like that you just take a view of that click on the wall hit the little icon down here that makes that wall invisible it's just temporary that's a nice way to do it and then unfortunately you'd have to what you could do is hit Ctrl Z to make it solid again just undo that command or if you have if you want to make it visible again you will have to go to the floor plan and select it so that would be an option um the other thing you can use is the delete surface button put this button up here that will temporarily delete the surfaces of items in your plan so you click on this and it's going to delete the sheetrock the framing the sheetrock and now you can see under the wall you see the baseboards still there though and all you have to do is click back on that button to put the surfaces back in or just hit F12 to refresh the display or just close the display and reopen it and it will all be back okay that helped cool are we good let's spin the wheel one more time Mr Moore I'm not sure if we'll be able to cover it in this but saved plan views the purpose and how it will help us in doing our drawings let me see if I can explain it real quickly um say plan views allow us when you think when you hear the word save plan views it's kind of a foreign word it's like huh what does that mean what you want to do is think of that word as the pages in your plan all right you're going to print the plan you're going to have floor plan you're going to have an electrical plan you're going to have a cabinet plan framing plan you know mechanical plan you can have all these pages in your plan so when you think of a saved plan you think of it as the pages in your plan and what we can do is preset those in Chief so that when we go to our plan and we can set those up for all the views in your plan get out of there so in this case if I have my saved plan views up here and they correspond with your layers in your default sets at least mine do so what I'm going to do here is go in and I'm working on you know we're talking about stairs before that's why I have all these goofy stairs in here but if I want to start working on my electrical plan I'm going to switch to my electrical and then I'm going to start working on that and then this is what I'm going to send the layout to print out now I want to work on my cabinet plan so I'm going to go to my nkba kitchen plan now I'm going to work on that and I'm going to add my default or my dimensions and the text and notes and cabinets and all the things that go into your cabinet plan now I'm ready to work on some framing so I'm going to switch to my framing plan and I'll go there and I'll work on the framing last night I framed this room Edition so there's my framing plan so now when I'm ready to print my views on my layout all I'm going to do is put these views in the right viewports there's my architectural plan there's my electrical Plan and there's my framing or my kitchen plan and there's my framing plan so again the goal is we want to keep everything in one plan file so we're not going to have separate files for each of those items one plan file and we just switch between plan views to display what we want to display that makes some sense okay good it's very confusing I mean it's it's one of those kind of settings in Chief that it's kind of about you'll use it use it use it and then all of a sudden you go oh okay now I kind of get it light bulb moment um we have lots of those with Chief so but real quick okay all right so I'm back on that last question I have the scaling set on my screen so that everybody could see this in the in the feed so I wasn't seeing the setting I wanted but here it is if we edit the active camera view and I needed to scroll down to see this last option here clip surfaces within this is another method you can use to kind of clip away surface and surfaces in front of you if I set this to 500 inches for instance it's okay you can see it Clips quite a bit of that that building out so you can clip surfaces within the camera if this is useful at all I've got another method as well let me undo that last bit there a little bit of lag here let me just hit undo and then the other one is we can actually add in some section Cuts so cross section slider also lives within your 3D menu camera view options cross section slider and we can cut the building any different number of ways so we can cut this building you know in one plane versus another we can even you know make compounded Cuts where we're cutting multiple planes at the same time to get to just the room we want so a couple other methods where we can get that Viewpoint that we want and then I'm going to try to tackle another question what is ambient occlusion Chief crashes if I don't have that set to zero now you probably have a driver issue for that about the crash but in terms of ambient inclusion we are we have the capability of adding Shadows where light is occluded right so if we don't have a direct light source a direct say we've got a light fixture anywhere there's um ambient occlusion it will produce a shadow I'll kind of give you a really quick example of this we're going to come into this scene I'm going to drop in a light source right here on the wall and then I'm going to adjust the material of this wall and I'm going to add in a ambient occlusion map if I can get to the bottom of my screen here ambient occlusion map I'm going to look in my materials I I happen to have a bunch of solids here that'll work I'm going to drop in a very dark black solid right there very dark black and when I press OK what we're going to see here is where there's a light we don't have that shadowing right but wherever there is no light it added that shadowing so this is your ambient occlusion map affecting this scene so if I switch to a ray Trace view unless I've got a lot of whites in the scene we're going to see a lot of Shadows because we added that really dark map so that's ambient occlusion and we can always in our edit active camera see if this opens while we're Ray tracing we can turn ambient occlusion down press OK and it's not going to affect that wall quite so much the slider isn't a great sliding scale in this aspect but here we go that should answer the ambient occlusion side of things so just a kind of bring this full circle we've got a tiled material here so if I were to instead make an ambient occlusion map that was something like my logo there we go it's it's tiling that shadow onto the wall we're producing a shadow where there was none so that's a that's a way we can produce kind of depth when we don't actually have depth um in Geometry we can kind of fake it with materials and then let's see what's this last part I think I need more info on this last question when you change the default material sometimes it changes in the plan immediately and sometimes it does not it might need to be that you're refreshing your scene and so you're rebuilding the the 3D geometry of the scene um you'd have to tell me more about that so I'd say write in on that because we're kind of out of time there we are we're done that's going to do it for today uh everybody if you would I would love it if you could uh

Elevate Your Chief Architect & Design Business Skills
Reserve your Spot to the 2024 Chief Experts Total Immersion Summit For Chief Architect Users
Outer Banks, NC
March 1 to 10, 2024

Mastering Kitchen, Bath, and Lighting Design BUNDLE - Only $595
Special Bundle Offer: Four Courses for Just $595!
SAVE $1,737
LIMITED TIME ONLY
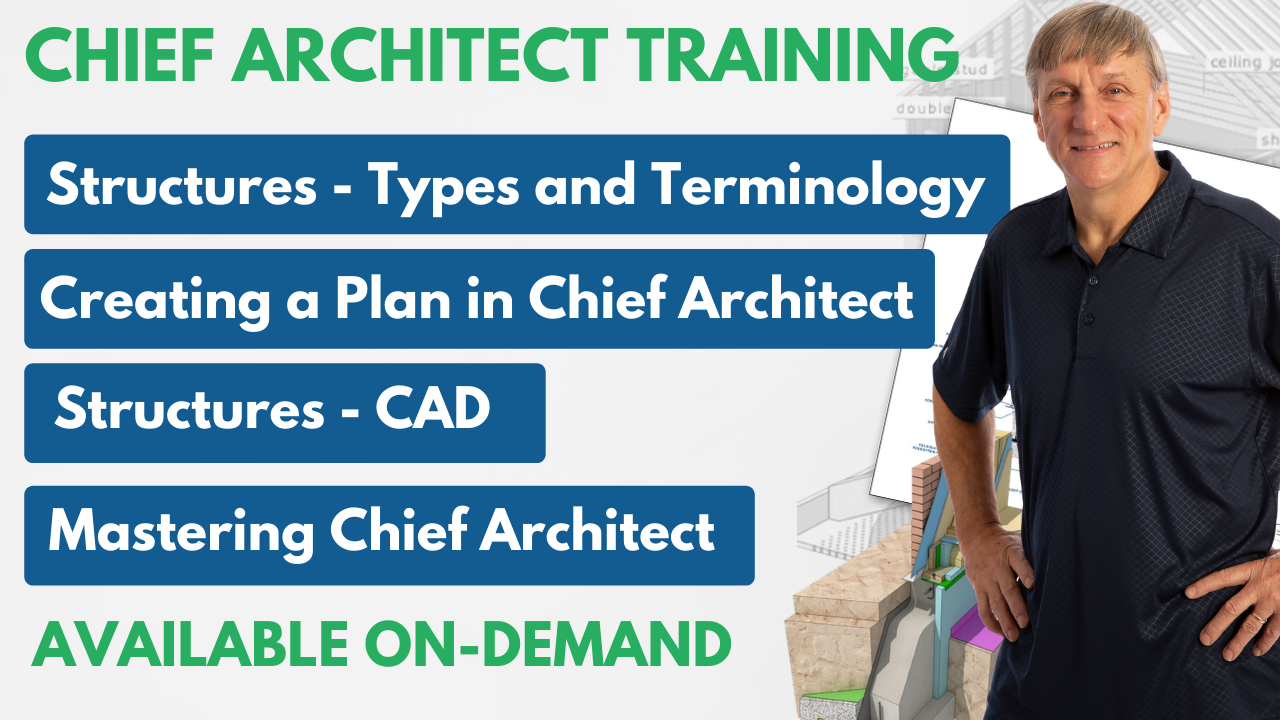
On-Demand Chief Architect Training
Don't Miss These New Courses With A Simple Goal: "Help You Become A Better Designer"
- Understand And Define The Structural Elements In Building Construction
- "Creating a Plan - Quick Start" course for Chief Architect users
- Define And Draw The Structural Elements In Your Projects
- Discover the Inner Workings of Chief Architect and What it Wants From You
Upcoming Events